The Growth Panel system is a character development mechanic unique to Unlimited Saga.
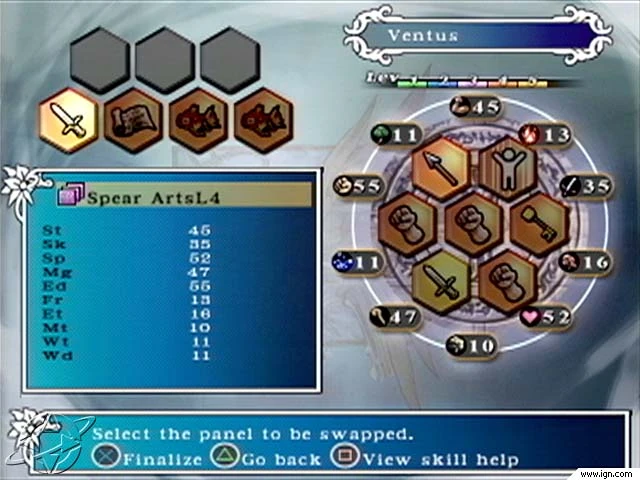
A Lvl4 Growth Panel
Explanation[]
Each character in the game posses a Growth Panel which is a 7 hexagonal field grid (2-3-2) with different panels of different levels on it. 4 new panels are (randomly) obtained after each quest.
While placing panels will increase a characters stats (as well as offer them new abilities), the impact is determined by various factors;
- Where you put the panel.
- What the level of the panel is.
- What type of panel you choose.
- What panels are placed next to it.
- What "making" of the specific attribute or magic the character has.
The Grid and positioning[]
The Growth Panel features 7 fields and icons which represent the attributes and magic levels around it. Whereas the 5 attributes have permanent locations, the magic schools are positioned differently for each character, but always in the same order as in the Taoism: Fire, Earth, Metal, Water, Wood, clockwise. A school of magic will always be next to 2 atributes and vice versa. The atribute/school of magic is affected by the panel closest to it, but due to the fact that the Growth Panel has 7 fields, 6 if we ignore the center one, which is not dividable by 10 nor 5, some atributes/magic schools are split between 2 panels.
- Top Left- Has some effect on Strength and Endurance, has big effect on the school of magic next to it.
- Top Right- Has some effect on Strength and Skill, has big effect on the school of magic next to it.
- Center Left- Has some effect on Endurance and the school of magic next to it.
- Center- Has some effect on all atributes and magic school levels.
- Center Right- Has some effect on Skill and the school of magic next to it.
- Bottom Left- Has big effect on Magic, has some effect on the schools of magic next to it.
- Bottom Right- Has big effect on Spiritl, has some effect on the schools of magic next to it.
Panel levels[]
Just like weapon skills, Panels come in 5 different levels in 5 different colors, the higher, the better. The higher level, the more the stats will be increased (and same goes for the abilities of the panel). Usually all panels you'll get at the end of the quest will be of the same level, however exceptions where the panels will be of 2 different levels do occur.
It's hard to tell what exactly determines what panel level you'll get, it can be the damage, the fact if the character was in any fight, used any skills.
- Level 1 - Green - The lowest level, regardless of that, very hard to get. To get a panel of such low level one would have to almost perfectly avoid any battle nor use any abilities throughout the entire quest and still chances would be that the character obtains a higher level panel. Most likely to be found on someone's starting growth panel than to learn.
- Level 2 - Blue - A fairly low level, but rather only occuring during the beggining of the game. Still, experienced players sometimes can manage to avoid Level 2 panels throughout the entire game.
- Level 3 - Pink - The most common panel, can be obtained even at the start of the game should the player do a marvelous job and at the end of the game should the player do very badly.
- Level 4 - Orange - A panel obtained quite late in the game. Most players end the game with these.
- Level 5 - Gold - The ultimate panel level. Some players manage to beat the game without ever obtaining a single one, very rare and challenging to get. Due to Ventus's constant access to the Carrier's Guild; his party is the only party that will probably see these at all.
Panel types
[]
The most important factor in determination of what attribute bonus the character gets is the type of panel being used. Each panel has different abilities and is best for raising different attributes.
Weapon Panels[]
These panels are very important and have several effects, which are all higher/different the higher the level of the Panel. All raise the damage dealt with the weapon, the chance to spark new Arts with the weapon and they re-arrange the panels on the reel when using that weapon. In case of weapons able to deflect attacks, it raises the chance to do so as well.
- Punch - Typical effect for Punch Arts.
- Kick - Typical effect for Kick Arts.
- Throw - Typical effect for Throw Arts.
- Dagger -Typical effect for Dagger Arts.
- Sword - Typical effect for Sword Arts.
- Axe - Typical effect for Axe Arts.
- Staff - Typical effect for Staff Arts.
- Bow - Typical effect for Bow Arts.
- Spear - Typical effect for Spear Arts.
- Gun - Typical effect for Gun Arts. But more about accurancy than damage.
- Shield - Raises chance to active the shield.
Defense type Panels[]
- Iron Body - Lowers damage taken from Slash, Hit and Pierce attacks
- Fortitude (Edel only) - Raises magic defence by 25%
- Toughness - Shortens time it takes to recover from status effects
- Recovery - Shortens time it takes to recover from mental status effects
- Natural - Lowers risk of physical status effects
- Iron Will - Lowers risk of mental status effects
Magic Panels[]
- Magic Tablet - When you use magic (in battle) it allows a character to decipher spells after a battle and permanently learn them, without the use of a Familiar. The character will, however, need a weapon/accessory with the correct spell type on (eg: Fire Arts to use Fire Arrows)
- Magic Blender - Allows you to mix and combine spells you've learnt into more powerful ones
Familiar Panels[]
- Fire Familiar - Lets you use a range of Fire Arts and Road Guide
- Earth Familiar - Lets you use a range of Earth Arts and Road Guide
- Metal Familiar - Lets you use a range of Metal Arts and Architect Guide
- Water Familiar - Lets you use a range of Water Arts and Cave Guide
- Wood Familiar - Lets you use a range of Wood Arts and Cave Guide
- Atlas (Judy only) - Lets Judy use a range of Earth Arts and Architect Guide
- Astraios (Judy only) - Lets Judy use a range of Fire Arts and Road Guide
- Aigaion (Judy only) - Lets Judy use a range of Water Arts and Cave Guide
Expert Panels[]
- Master Technician - HP cost for weapon Arts -20%
- Master Magician - HP cost for spell Arts -20%
- Thrift Saver - 20% of not using up durability when using an item/weapon
Mastery Panels[]
- Master Fighter - Combined effect of Punch, Kick and Throw panels all at Lvl 3
- Master Magician - Reduces the HP cost of magic arts by 20%
- Weapons Meister - Combined effect of Sword, Dagger, Axe, Staff and Bow panels all at Lvl 3
Exploration Panels[]
- Road Guide - Search outside areas for hidden treasure chests
- Cave Guide - Search caves/caverns for hidden treasure chests
- Architect - Search buildings for hidden treasure chests
- Obstacle Crossing - Ability to cross rock obstacles on the map
- Swimming - Ability to cross water obstacles on the map
- Adaptability - Shortens time to recover HP
Support Panels[]
- Eavesdrop - Shows the location of beasts, wildlings, birds, insects and undead on the map
- Aura - Lowers enemy attack rate and trap difficulty
- Sharp Eye - Scans treasure chests/items for traps or locks
- Defuse - Deactivates traps
- Locksmith - Unlocks chests and doors
Negotiation Panels[]
- Merchant - Lower prices at shops (panel level x 5)%
- Monger - Lower prices at shops (panel level x 5)%
- Maharaja - Increases prices at shops and Merchant Rank quicker
- Diplomacy - Allows you to make monsters leave the map (Hitting Dynamite forces the monster to fight)
- Inconspicious - Lowers risk of being attacked (similar to Aura)
- Fashion - Increases efficiency of Merchant/Maharaja by 5%, makes Diplomacy easier
Item Panels[]
- Artiste - Shows hidden/special items in shops, makes it easier to unlock abilities on equipment
- Quick Fix - Allows you to add small amount of durability to items (Red cross/Dynamite lowers durability)
- Weapon Smith (Mythe only) - Allows different types of weapons to be made at Mythe's Workshop
- Accessory Smith (Mythe only) - Allows different types of item/shield to be made at Mythe's Workshop
Occultism Panels[]
- Fortuneteller - Increase item level in a chest and shows what item is in chest (Red cross lowers item rank. Dynamite reduces chest to rank 1 and opens it automatically)
- Arcane Tongue - Reverses the order on a Magic Tablet so that higher level spells can be learnt first
Negative Panels[]
- Phobia - Drastically reduce the damage caused to a certain monster type (undead, beast, slime etc). The most abundant example of this is Tiffon's Undead Phobia in the centre of her Growth Panel.
- Pacifism - Inflicts LP damage upon the character when they inflict LP damage on a monster of a specific type
- Seal Weapon - Prevents the character from using whatever weapon type the panel corresponds to (martial, sword, dagger, axe etc).
- Cursed Gauntlet (Kurt and Michelle only) - The character will be pulled into a one-on-one battle every 15 minutes. The stronger the panel the stronger the enemy faced. (This only applies to Kurt and only when he's the main character. Michelle nevers enters these battles during actual Gameplay.)
All types of negative panels can only be replaced by other negative panels. Each character can have upto a maximum of 5 negative panels on their Growth Panel. While the concept of giving yourself a handicap against certain monster types seem useless, some Negative Panels can have massive stat bonuses to magic elements and growth.
Panel combos[]
As an addition, if there are 2 or 3 panels placed in specific positions and share the same icon, the character obtains a stat bonus. An even higher level bonus is bestowed if both panels share the same level.
Magic Tablet - Technically not a Panel combo, but listed as one. If a Magic tablet is finished studying and kept on the Growth Panel, it shall bestow a stat bonus upon itself.
Joint - The most basic combination. If two panels next to each other share the same icon, they are given a slight bonus.
Triangle - When 3 panels share the same icon and are in a triangular patten (not next to each other), a decent stat bonus is given. This can be either (Top Right + Mid-Left + Bottom Right), or (Top Left + Mid-Right + Bottom Left).
Line - When 3 panels with the same icon are in one stright line through the center panel, a large stat bonus is given.
The stat bonus gained depends on the panel(s) used:
- Strength +2, Endurance +2: Punch, Kick, Throw, Spear
- Strength +2, Skill +2: Sword, Bow
- Strength +2, Spirit+4: Seal weapon, Seal Martial Arts.
- Strength +3, Endurance +1: Axe
- Strength+2, Magic +6: Phobia.
- Strength +1, Skill +1, Spirit +1, Endurance +1: All Mastery panels.
- Skill +4: Gun
- Skill +3, Metal +2: All item panels
- Skill +2, Earth+2: All support panels.
- Skill +2, Spirit +2: All Expert Skills
- Skill +2, Magic +1, Endurance +1: Dagger
- Spirit+3, Endurance +1: Staff
- Spirit +2, Wood +2: All negociation panels.
- Spirit+3, Magic+1: All of Judy's special familiars.
- Spirit+1, Magic+3: All familiars that are not Judy's specials.
- Spirit+3, Magic +3: Pacifist
- Magic +3, Fire+2: All occultism panels.
- Endurance +4: All defense type panels
- Endurance +2, Water +2: All exploration panels.
- All Elemental stats: Magic Tablet, Magic Blender,
Making[]
The last factor to determine the growth is the "making". Some character have talents for specific stats while other are terrible at them. Some have a low making, hence they might never get the attribute above 20 while others might have a high making and be able to get the attribute over 50 without any effort.
To see the making of the characters in Unlimited Saga you can either go to the status menu in the game or go to our wiki's List of characters in Unlimited Saga, where the information is listed.